…how I got myself up to 100% productivity while 0% vertical.
Contents
- Overview
- Display: how do you look at a monitor while you’re lying on the floor?
- Input: how do you type and click while you’re lying on the floor?
- Display: post-COVID, WFH update
- Recap
Overview
At some point in 2017, I found myself with a herniated lumbar disc (my extended story here). I eventually ended up with a relatively minor surgery with fantastic results, but there was a period before surgery when I was, in scientific terms, a total f’ing mess. Aside from the egregious doses of Tylenol and Tramadol I was taking, I was good for about an hour of standing up before I had to lie down on my back to let the pain subside. Sitting was not on the menu at all, as it resulted in almost-immediate tingling and pain in my leg. The sitting issue wasn’t a big deal, since I was already working at a standing desk, but the fact that I had to stop working every hour and lie down was a huge intrusion on productivity.
I tried taking calls while lying down, or reading useful things on a phone, but there are only so many calls to take (and nearly every call I take requires me to be at a keyboard), and absolutely nothing useful happens on a phone. So I was at maybe 60% productivity.
After a month or so of this, without knowing how far off the end was in terms of either healing or surgery, I started thinking seriously about making myself actually productive while lying on an office floor. And with a little effort and a few gadgets, I was able to get myself up to 100% productivity lying down. This post will describe said gadgets, and hopefully be useful to the next person fighting one back issue or another.
I’ll first talk about how I dealt with the display issue, then how I dealt with the input (keyboard/mouse) issue.
Display: how do you look at a monitor while you’re lying on the floor?
Assuming you’re working at a desk, no need to build a special contraption to put a monitor in front of your face: I opted to just mount a monitor on the bottom of the desk. Especially if you’re at a sitting desk, but even at a standing desk, your monitor won’t be that high off the floor, so you neither need nor want a huge monitor. In particular, it’s suboptimal to have a heavy monitor fall on your face. So I searched Amazon for the lightest monitor available that would do full-HD resolution (which by 2018 standards isn’t particularly high-res). I ended up at a Dell Ultrasharp 24″, at 8.7 lbs. We’ll use a mount rated much higher than this, but be safe, please, and keep it under 10 lbs. This monitor is currently selling for about $80 on eBay.
Mounting the monitor under the desk is as simple as using a flat wall-mount; I used this VideoSecu mount, rated for 65+ lbs (admittedly rated for wall-mounting weight, not upside-down weight). These are under $15. On a wall, I might be a little lazy about putting screws in every available hole; for this application, I put the longest possible screws (i.e., just shorter than the depth of the desk) in every possible hole on the mount). It was definitely overkill, but it's basically free to max out the load-bearing capacity of the mount with lots of long screws.
The result: a perfectly viewable monitor mounted at almost exactly the same distance I would see a monitor on my desk. Not just great for working at, but a surprisingly Zen way to get into a desk-cave and watch Netflix.
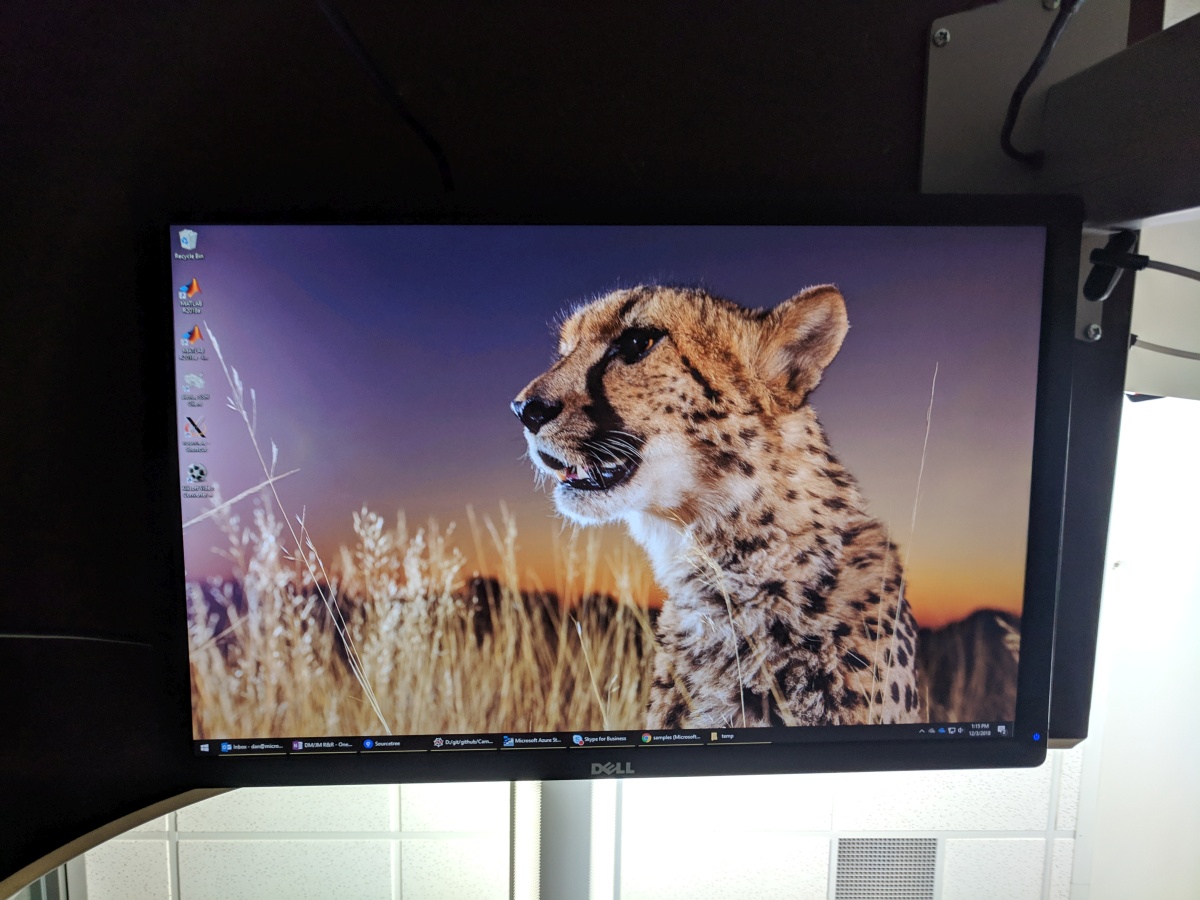
All of this assumes a large desk in an office; said office ceased to exist post-COVID. See below for a 2022 update on a different monitor configuration.
Input: how do you type and click while you're lying on the floor?
The mouse part of this equation ended up being trivial; it's quite comfortable to just put a USB touchpad on the floor, near your hip. I had a Cirque device lying around; these go for about $25 on eBay, and there are lots of others like this.
The hardest part of this project was figuring out a way to type while lying down. I took the ergonomics of this pretty seriously; laying a two-piece keyboard on the ground and typing with my wrists twisted was not going to cut it. In fact, some early experiments with mounting a two-piece keyboard vertically – but basically on the ground – was an informative disaster, in that reaching for the keys closest to the ground was super-awkward, to the point of not being useful.
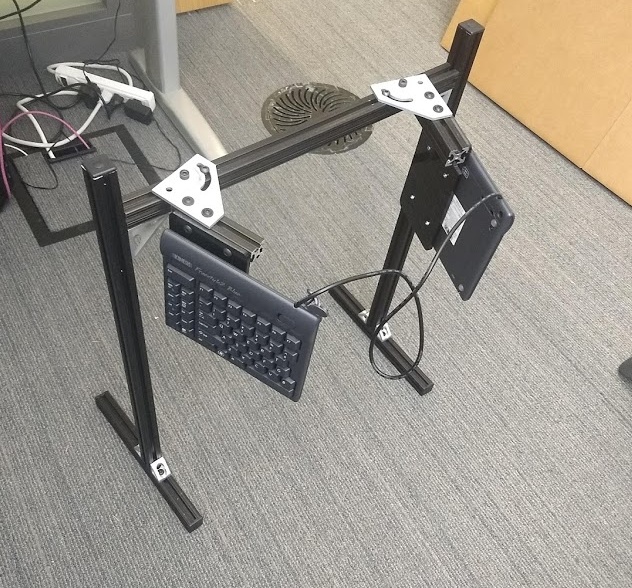
The trick was finding a way to get the keyboard split, vertical, stable, and at least a few inches off the ground, and of course to do it in a way that didn't require me to assemble a human cage around myself every time I lay down.
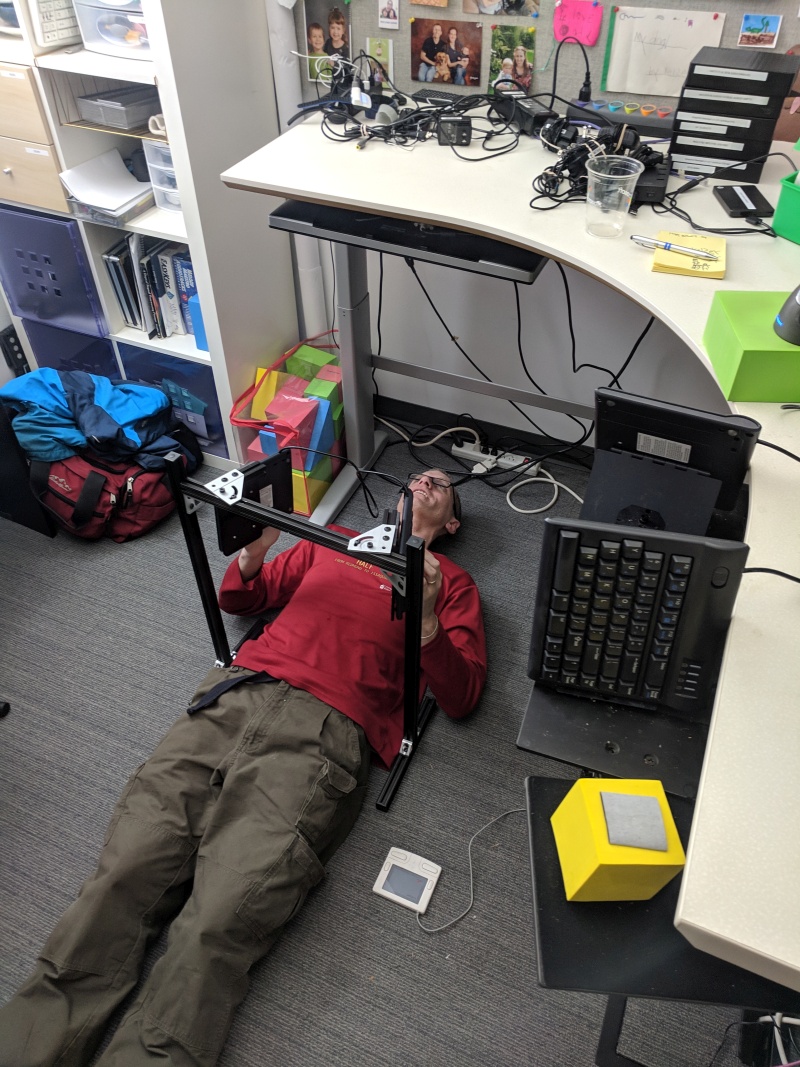
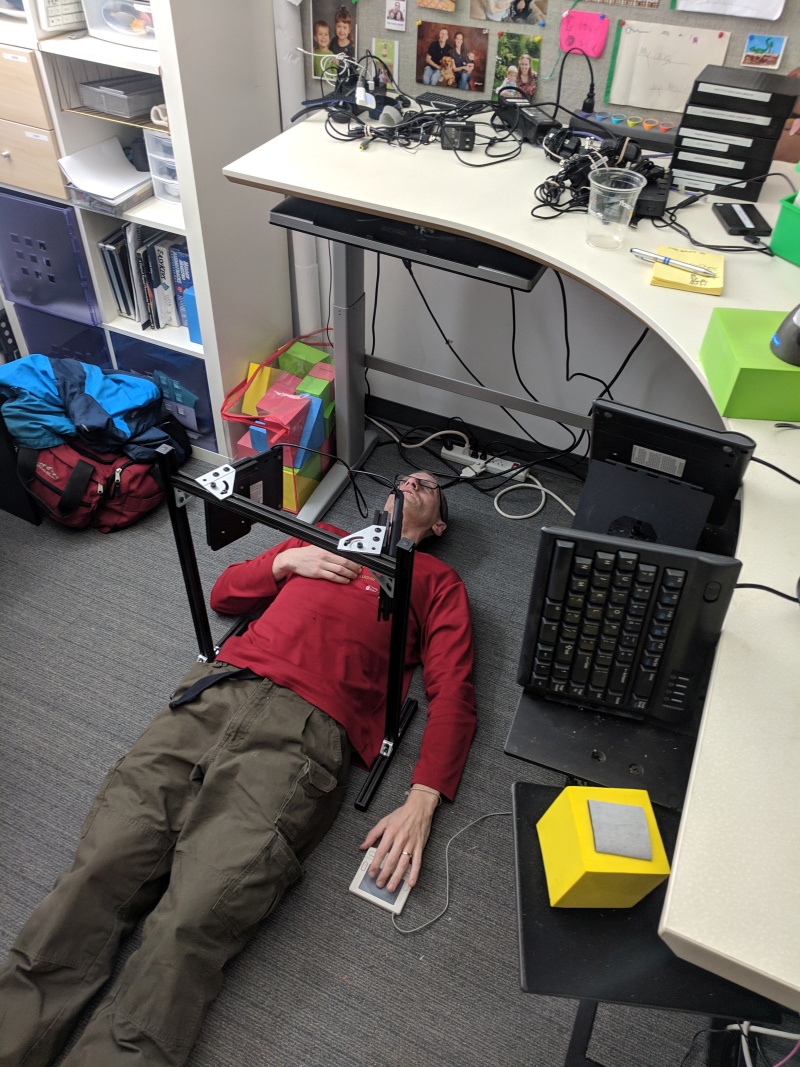
So with the help of my mechanical-engineer friend Chris O'Dowd (and by "help" I mean "he designed and built everything"), we put together this 80/20-based rack to hold a Kinesis Freestyle Bluetooth split keyboard, at an adjustable height and angle, but typically about 12" off the ground.
Admittedly, I have the benefit of already using a split keyboard even when I'm standing, but FWIW, it took me zero seconds to get used to the floor setup, and I was immediately typing at normal speed and normal comfort. And by "normal comfort", I mean "as comfortable as my standing setup", i.e. a zillion times more comfortable and more ergonomic than a laptop.
More shots of me comfortably and happily in my productive ergo-cave:

The keyboard is not cheap (currently around $100 on eBay), but there's not an easy substitute that I know of. The required 80/20 materials are:
- 4 x 4132 (10-series 2-hole gusseted inside corner bracket)
- 2 x 4136 (10-series 4-hole tall gusseted inside corner bracket)
- 1 x 4136 (10-series 90-degree left-hand pivot bracket plate)
- 1 x 4137 (10-series 90-degree right-hand pivot bracket plate)
- 1 x 3501 (2-pack of 5/16 x 1/4" shoulder bolt with washers)
- 28 x 3382 (1/4-20 slide-in t-nut)
- 26 x 3061 (1/4-20 x 0.5" button head socket cap screw)
- 1010 rail, specifically 2x12" (feet), 1x19" (crossbar), 2x24" (legs), and 2x4" (keyboard mounting bars)
Total 80/20 cost around $75.
For this blog post, I'm glossing over the mounting plate that actually attaches the keyboard to the 80/20. If you've gotten this far and are really going to build one of these, mail me to ask about that.
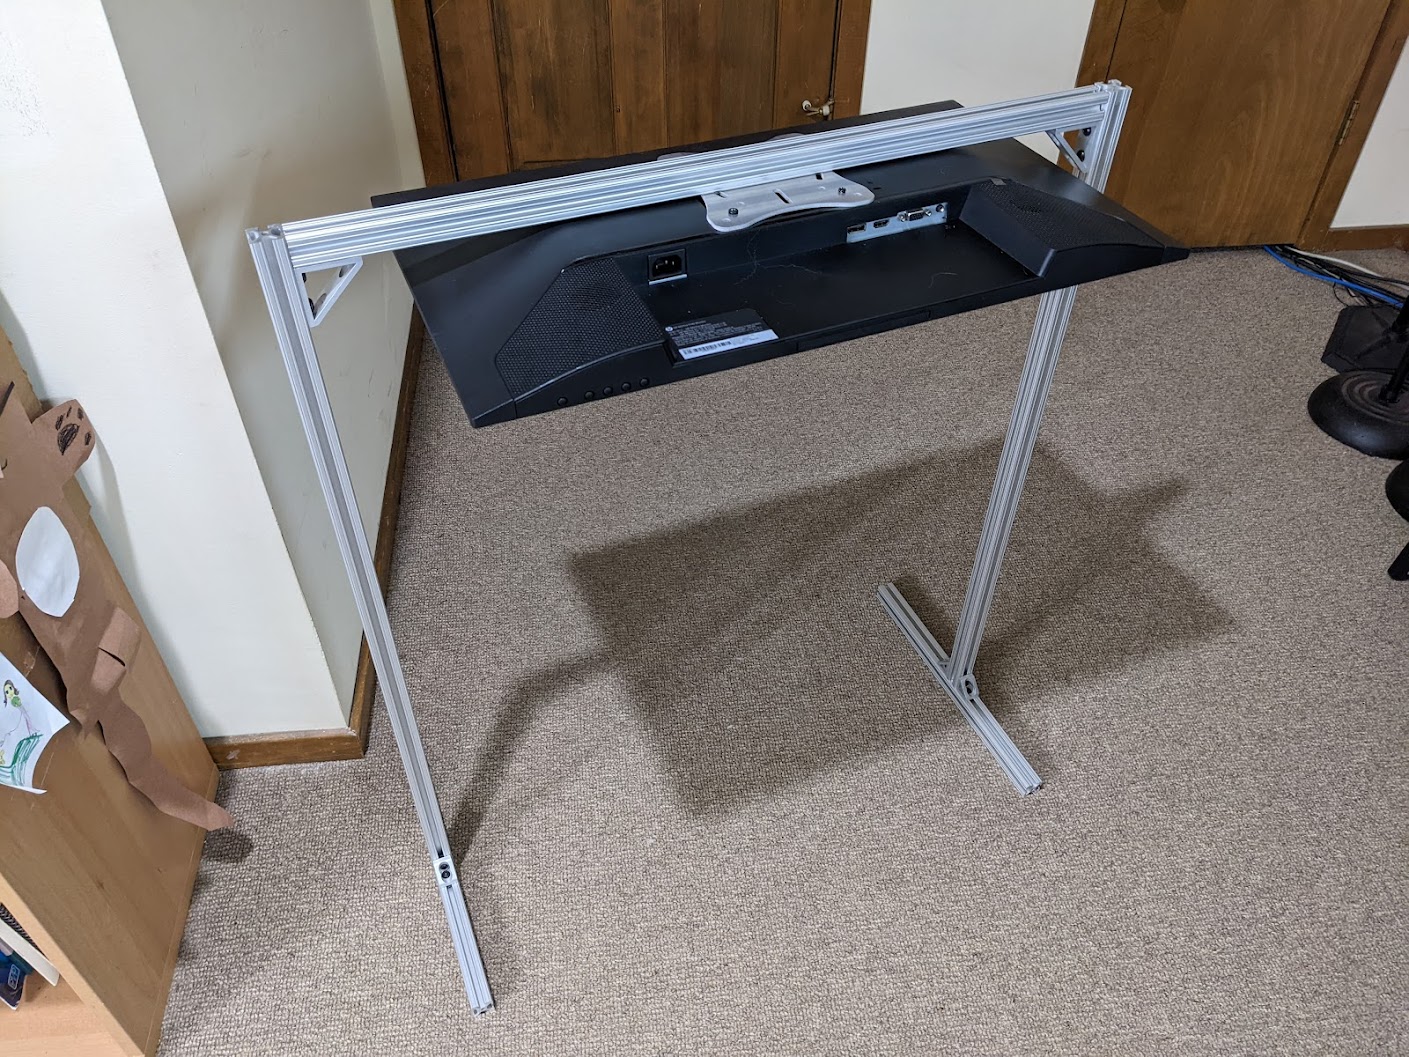
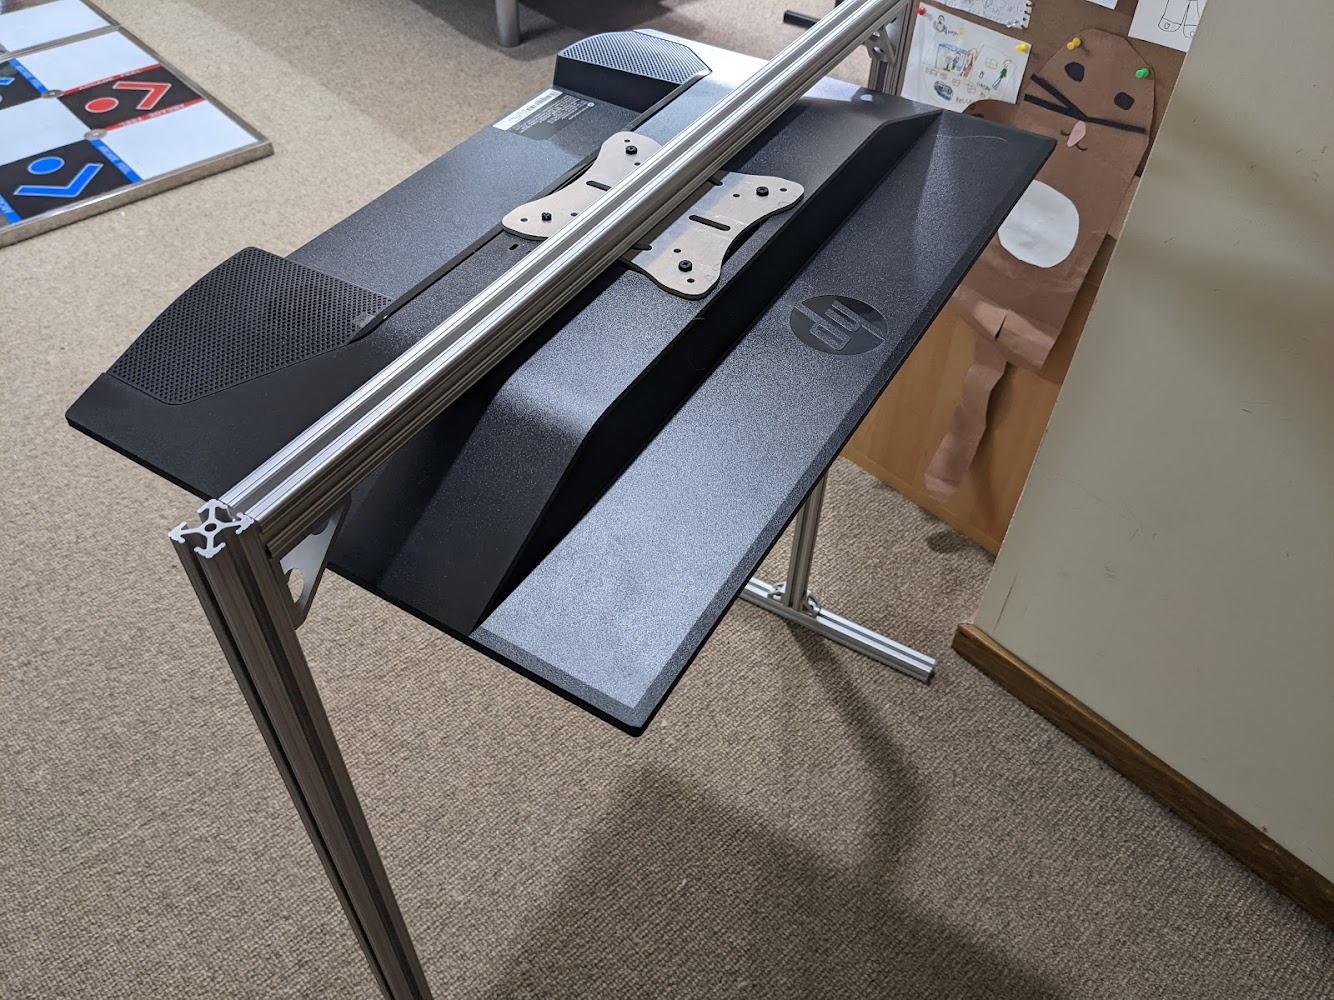
Display, take two: 2022 update
Permanently affixing the monitor to the bottom of a desk was a good idea at the time, but it turns out that desks are big and don't really move with me from office to office, or - post-COVID - from office to home. So in 2022, rather than mounting directly on a desk, I built basically a larger version of the U-shaped keyboard mount, that could mount a monitor. This is tall enough to sit comfortably above the keyboard mount, and short enough to fit comfortably under a standing desk.
The required 80/20 materials are nearly identical to the parts required for the keyboard mount, just with different rail lengths:
- 4 x 4132 (10-series 2-hole gusseted inside corner bracket)
- 2 x 4136 (10-series 4-hole tall gusseted inside corner bracket)
- 1 x 4136 (10-series 90-degree left-hand pivot bracket plate)
- 1 x 4137 (10-series 90-degree right-hand pivot bracket plate)
- 1 x 3501 (2-pack of 5/16 x 1/4" shoulder bolt with washers)
- 28 x 3382 (1/4-20 slide-in t-nut)
- 26 x 3061 (1/4-20 x 0.5" button head socket cap screw)
- 1010 rail, specifically 2x16" (feet), 1x29" (crossbar), and 2x34" (legs)
Then last but not least, this 80/20-friendly VESA mounting plate, to attach the monitor to the crossbar.
Recap
This setup was incredibly useful to me while I was deciding whether or not to undergo surgery for my L4/L5 disc herniation; I was able to go from a miserable 60% productive to a strange-but-pleasant 100% productive thanks to this approach. In many cases, this would have been equally useful for recovery, but my recovery was remarkably fast and I was able to put this whole mess behind me relatively quickly. But I've got this setup stashed away in case I smash my body again (I probably will), and I still occasionally chill out and watch football under my desk.
Hopefully this concept is useful to at least one person out there struggling with back issues. At present, this setup is not cheap (totaling around $500), but it's cheap compared to being miserable, and it's cheap compared to losing 50% of your productivity, and if the concept is useful, certainly there's a way to package all of this up for much less.
Happy horizontaling!